Balancing a Setup’s Components while Maintaining Randomization

Who has played a game of Argent: The Consortium where the only way to gain IP was to get wounded? Or where there are lots of Buy actions, but only a single acquire Gold action? Or where the room resolution sequence is completely backwards? Those situations make for interesting games, to be sure, but only for experienced players who know how to zig when the game zags. Players who are new to Argent often find these types of games difficult to play. Not only are they trying to learn the rules and basic strategy, they are also forced to deal with a weird edge-case caused by a randomized setup.
A lot of games have this problem with their setups. A completely random setup can make for a very wonky game when sometimes you just want a normal, "balanced" game. How does one fix that? I would usually just rearrange the components a bit or swap them out with one from the box to make the game a bit more playable, but I was always worried I was introducing my own bias in some way.
Several years ago, I began writing Setup Helpers (as web apps) to help with games that have a lot of randomized components, especially ones with complex setups or where you are mix and matching modules. Or, like Argent, where you not only need to randomize the rooms, you need to randomize which side you want to use. Eventually, I began adding "setup balancing" logic to help with avoiding edge-case setups like the ones above.
I have just published a new Balancer for my Argent: The Consortium Randomizer & Setup Helper and below I explain the process of designing and writing it.
The term "balanced" isn't a great term because it can mean several things within the context of boardgames. It could mean making a game "easy" as in removing some of the complex elements of a game making it beginner friendly. Or it could mean "fixing unbalanced mechanics" as in removing overpowered/broken elements from the game all together. Or it could mean "avoiding edge-case scenarios" such as extreme resource scarcity (ex. no acquire IP spots in the game) or powerful hot-spots.
The latter is what I'm here to talk about. I'm not trying to make an easy layout (there's already one printed in the rulebook) and I'm certainly not trying to fix any mechanics (play testers took care of that long ago). And it is important to note I am not balancing the game either. Instead, I am generating a balanced setup such that a reasonably normal game will be played. I'm trying to avoid wonky setups like situations in this thread on BGG where there were no Acquire Gold spots in the University thus making Technomancy very hard to play. Or where you end up with all Immediate rooms or where the activation sequence is completely backwards.
I call those setups "wonky" and, again, those games can be quite interesting for the experienced player. In fact, for some of my other Setup Helpers (such as my Food Chain Magnate Map Generator) I've added an option to "make things interesting" where it purposely gives you a wonky map. But I digress; I'm looking to generate balanced, non-wonky Argent setups to make the game playable, enjoyable and relatively normal while also maintaining a randomized approach.
So, how do I do that? In general, I follow 6 steps:
- Understand the Game
- Define Quantifiable Attributes
- Collect Data
- Do Statistical Analysis
- Apply Specialized Logic
- Update the Game Setup Helper
It is important to note that am only balancing setups based on public knowledge at the beginning of the game. For example, I can take the University rooms into consideration because they can be seen by all at the start of the game; same with the mage powers. However, the individual Vault, Supporter, and Spell cards create far too many permutations to take into consideration in terms of balancing. Thus, the generator isn't shuffling decks in memory and telling which cards to display. Instead, it will only tell you to lay out three face-up Vault cards, five face-up Supporters, and so on.
The first and most obvious step is to understand the game I am trying to balance. Understanding the overarching strategies of the game is crucial so I can better understand how each setup option will affect later aspects of the game. Like I mentioned above, if gold is extremely scarce, then the player with Technomancy will have a tough time making use of his/her mages throughout the game. Also, the activation sequence of the rooms can cause resource shortages during rounds.
It’s easy to control for these issues during initial setup, but being able to identify them prior to the start of the game takes skill. This can only be done by having enough experience to know how the game unfolds over its course and how the components interact with each other. Another thing I do is read the forums on BGG, particularly any that involve people complaining about unbalanced or broken elements. All of this gives me insight to how the game's mechanics operate.
In the end, I need to be able to identify the "pain points" that lead to wonky or difficult games. Many are common among all games:
- Scarcity of resources, especially when one player requires the scarce resource more than others
- Equal access to resources
- Ability to spend resources
- Sufficient number of action spots
- Sequence of resolution
- Differences in character powers
What the heck is a "Quantifiable Attribute"? A Quantifiable Attribute is an element of the game's setup that is directly related the balance of the game and can be identified by a numerical value. For example, before the game starts I can physically count the number of acquire Gold and spend Gold action spots in the University. These two numbers are Quantifiable Attributes. I will later run statistical analysis on them to determine a range of acceptable (i.e. balanced) values.
All of these are attributes and their values are public knowledge at the beginning of the game. For the Argent Balancer, I identified 19 Quantifiable Attributes.
- Number of Total Action Spots - This is the total number of regular, non-shadow action spots. It includes all Immediate and Resolved action spots (Infirmary spots are not included). This value is used to calculate Number of Action Spots per Mage which, assuming each player starts with 5 mages, is the average number of options each mage will have during the first round (excluding ones with Shadowing ability). This indicates how constrained players will be for actions at the beginning of the game.
- Number of Shadow Spots - This is the number of Shadow action spots. This number will less than the Total Action Spots because not every action spot has a shadowing counterpart (ex. Golem Lab).
- Number of Immediate Action Spots - This is the total number of regular, non-shadow action spots that in Immediate rooms. This indicates how fast the game will be played (because of less time spent during the Resolution Phase). It also helps define the Activation Sequence of rooms in terms of resource management (more on that later).
- Number of Grow Family Spots - This is the number of regular, non-shadow action spots that allow a player to draft a mage. This indicates how constrained players will be for actions if they grow to 7 mages each.
- Number of Acquire Gold Spots - This is the number of action spots that allow you to acquire Gold.
- Number of Spend Gold Spots - This is the number of action spots that allow you to use Gold for some function such as convert to Mana or Buy a Vault card.
- Number of Delta Gold Spots - This is difference between the total number of Acquire Gold Spots and the total number of Spend Gold Spots. It indicates if the University is going to be Gold rich or Gold poor.
- Number of Acquire Mana Spots - This is the number of action spots that allow you to acquire Mana.
- Number of Spend Mana Spots - This is the number of action spots that allow you to use Mana for some function such as convert to Gold or get a benefit.
- Number of Delta Mana Spots - This is difference between the total number of Acquire Mana Spots and the total number of Spend Mana Spots. It indicates if the University is going to be Mana rich or Mana poor.
- Number of Acquire IP Spots - This is the number of action spots that allow you to acquire IP. In my opinion, IP is the most important resource of the game due to its tie breaking ability and access to Merit Badges. A game will very few gain IP spots (or none!) makes for a very wonky game.
- Number of Spend IP Spots - This is the number of action spots that allow you to use IP for something (a relatively rare action).
- Number of Acquire Intelligence Spots - This is the number of action spots that allow you to acquire Intelligence.
- Number of Acquire Wisdom Spots - This is the number of action spots that allow you to acquire Wisdom.
- Number of Acquire Research Spots - This is the number of action spots that allow you to research Spells (acquire new ones or upgrade existing ones). It can also be defined as Spend Intelligence/Wisdom.
- Number of Delta Research Spots - This is difference between the total number of Acquire Intelligence/Wisdom Spots and the total number of Acquire Research Spots. It indicates how Spell heavy the game will be.
- Number of Acquire Mark Spots - This is the number of action spots that allow you to place a Mark.
- Number of Acquire Supporter Card Spots - This is the number of action spots that allow you to either draft or draw a Supporter card.
- Number of Acquire Vault Card Spots - This is the number of action spots that allow you to either buy, draft or draw a Vault card.
Example 1: Adventuring Side A
- Number of Action Spots = 3
- Number of Shadow Spots = 3
- Number of Immediate Spots = 0
- Number of Family Grow Spots = 0
- Number of Acquire Gold Spots = 1
- Number of Spend Gold Spots = 0
- Delta Gold Spots = n/a
- Number of Acquire Mana Spots = 0
- Number of Spend Mana Spots = 0
- Delta Mana Spots = n/a
- Number of Acquire IP Spots = 2
- Number of Spend IP Spots = 0
- Number of Acquire Intelligence Spots = 1
- Number of Acquire Wisdom Spots = 1
- Number of Acquire Research Spots = 1
- Delta Research Spots = n/a
- Number of Acquire Mark Spots = 0
- Number of Acquire Supporter Card Spots = 1
- Number of Acquire Vault Card Spots = 1
|
 |
 |
Example 2: Laboratory Side A
- Number of Action Spots = 3
- Number of Shadow Spots = 3
- Number of Immediate Spots = 3
- Number of Family Grow Spots = 0
- Number of Acquire Gold Spots = 3
- Number of Spend Gold Spots = 3
- Delta Gold Spots = n/a
- Number of Acquire Mana Spots = 3
- Number of Spend Mana Spots = 0
- Delta Mana Spots = n/a
- Number of Acquire IP Spots = 0
- Number of Spend IP Spots = 0
- Number of Acquire Intelligence Spots = 0
- Number of Acquire Wisdom Spots = 0
- Number of Acquire Research Spots = 3
- Delta Research Spots = n/a
- Number of Acquire Mark Spots = 3
- Number of Acquire Supporter Card Spots = 0
- Number of Acquire Vault Card Spots = 3
|
I built the Argent Randomizer & Setup Helper several years ago to help me randomize University layouts and other setup elements. Thus, it was easy to have it calculate the Quantifiable Attribute values and store them in the database. But it's more complicated than that. Because if I just generated a bunch of random layouts, the Quantifiable Attributes won't add up properly because I would be comparing apples to oranges.
For example, the ideal number Acquire Gold spots in a 3-player game with only 8 rooms is going to be different than the ideal number Acquire Gold spots in a 5-player game with 15 rooms. Further, in 5-player game, the ideal number Acquire Gold spots using only A Side Rooms only is going to be different than the ideal number Acquire Gold spots using both A and B Side Rooms (or even the rarely-used B Side Rooms only setup) because the distribution of actions is different between sides. Even further, in a 5-Player, A Side Rooms only game, the ideal number Acquire Gold spots in a Base-Rooms-Only game is going to be different than the idea number Acquire Gold spots in a Base-Plus-Mancers-Rooms game because, again, the distribution of actions is different between the room pool you are drawing from.
Thus, I need to generate setups for each of those permutations so I can do statistical analysis on each one independently. I instructed the Argent Randomizer & Setup Helper to generate games with different values of these setup options and then store the Quantifiable Attributes:
- Different number of players because that affects the board size
- Room sides: A rooms only, A or B rooms (chosen randomly between the two), and B rooms only (rarely used, I've found)
- Whether or not to use Mancers rooms because some people will only want to play with the core rooms, some people will want the Mancers rooms added to the mix
This ends up being 27 different setup permutations of which I generated 2500 games each. Thus, I generated over 67,000 total games which produced over 12 million data points relating to the above attributes and more. I felt that was enough data to provide solid statistical averages. I used a Microsoft SQL Server database to host the data and do the most of the calculations for me.
To me, this is where the real fun starts. This is when I answer the questions: What makes for a Gold-rich or Gold-poor University? What about IP, is there enough? What are the values that define the difference between balanced and wonky? We can find the answers to these questions and more using statistics.
Because of the 27 setup permutations each one with 19 Quantifiable Attributes, I need to determine 513 total threshold ranges:
- 2 Player Layout - A side only - Base Rooms Only
- Acquire Gold Spots
- Acquire Mana Spots
- Acquire Vault Card Spots
- etc...
- 2 Player Layout - A and B sides - Base Rooms Only
- Acquire Gold Spots
- Acquire Mana Spots
- Acquire Vault Card Spots
- etc...
- 2 Player Layout - B side only - Base Rooms Only
- Acquire Gold Spots
- Acquire Mana Spots
- Acquire Vault Card Spots
- etc...
- etc...
I use a statistical device called the Box Plot to determine the ideal threshold ranges. I'm not going to go into the math here, but if you're interested, you can read an overview of it on Wikipedia or a more detailed explanation of it here .
Simply put, Box Plot divides a data set into 4 groups (called quartiles) which allow me to see the data profile and to identify outliers. Then, I can then use the middle two quartiles to define the "sweet spot range" for a given attribute because they contain a statistically significant number of average values. The highest and lowest values of the inner two quartiles define the threshold range which comprises of an ideal minimum value and an ideal maximum value.
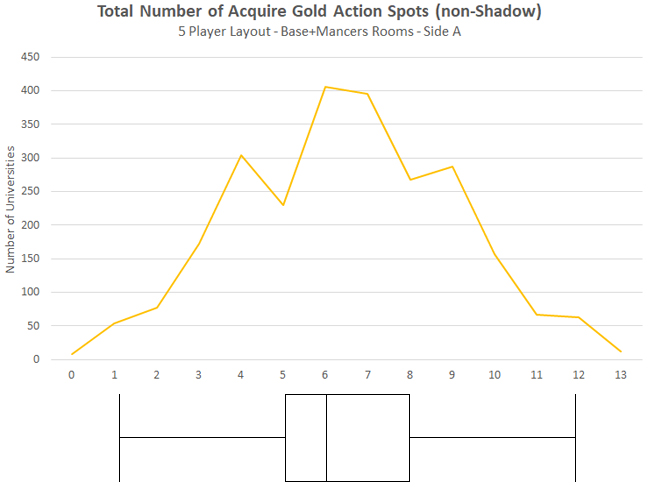 |
This graph shows a relatively normal distribution (bell curve) of Acquire Gold spots across 2500 random 5-player Universities.
The box plot (below the graph) shows us that a statistically significant number of Universities have between 5 and 8 Acquire Gold spots in them.
Ideal Range: 5 to 8
The box plot also shows us that Universities with less than 5 or more than 8 Acquire Gold spots are unbalanced. Further, any with 0 (none) or 13 Acquire Gold spots are extremely unbalanced (values beyond the whiskers).
|
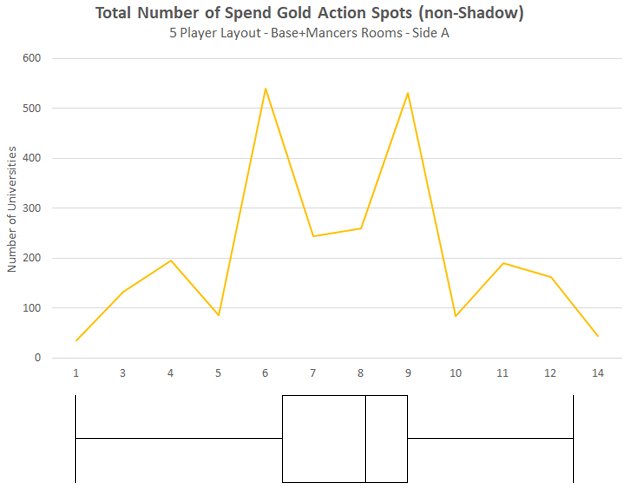 |
This graph shows a somewhat normal distribution of Spend Gold spots across 2500 random 5-player Universities.
The box plot (below the graph) shows us that a statistically significant number of Universities have between 6 and 9 Spent Gold spots in them.
Ideal Range: 6 to 9
The box plot also shows us that Universities with less than 6 or more than 9 Spend Gold spots are unbalanced. Further, any with 14 Spend Gold spots are extremely unbalanced (values beyond the whiskers).
|
What results is a list of thresholds with maximum and minimum values for each of the setups which I can now compare to the values when generating new, random Universities.


However, using the quartile-calculated threshold ranges isn’t enough to make for a balanced setup. This is because they only balance the University rooms and not any of the other setup components such as mage powers or player characters. Thus, I included additional, specialized logic to the Balancer to factor in other aspects of the random setup. This is where understanding the game makes a big difference.
For example, the Technomancy mage powers, both Side A and Side B, require Gold to be used. The ideal range of Acquire Gold Spots calculated above doesn’t take that additional need into account. That range is only calculated based on the average number of Acquire Gold Spots in randomly generated Universities. Thus, what might seem be enough Gold on average, might be a little tight with Technomancy in play. Thus, I increase the Acquire Gold threshold slightly when Technomancy is in play to make sure there is plenty of Gold to go around.

Another major aspect of Argent that needs to be addressed is unrelated to the number of action spots. It is the sequence of room activation during the Resolution Phase. Even though the Balancer guarantees enough Acquire Gold spots, we want some of them to activate before the first Buy spots do so you can actually buy something. Of course, you can just hold on to your Gold for the next round, but I prefer to spend my paycheck the day-of. Thus, the Balancer will look at the randomized University sequence and adjust it slightly such that least one Acquire spot of a given resource activates before the first Spend spot. Note, that it considers Immediate rooms as “step zero” in the Resolution Phase because technically you'll have the resources / benefit before the resolution of the first regular room.
For example, these two rooms (see right) need to be swapped so that during the Resolution Phase the Guilds will activate first and provide the Gold for use when the Students Stores activates.
However, these rooms (see below) do not need to be swapped because the Laboratory is an Immediate room providing Gold during the Errands Phase, which can then be used for Buys when the Student Stores activates in the Resolution Phase.
The final step is to build the balancing logic into the Setup Helper. I'm going to gloss over this because it's mainly a software developer's problem at this point. The Argent: The Consortium Randomizer & Setup Helper follows these steps to generate a Balanced, but still random, setup:
- Generate a completely random setup.
- Obtain the set of acceptable thresholds for the Quantifiable Attributes based on:
- The Number of Players
- The Side Option (A only, A or B, B only)
- Whether or not to include the Mancers rooms
- Compare the random setup’s actual values to the ideal thresholds.
- Calculate a "Balance Score" based on how far away the actual values are from the ideal thresholds.
- If the Balance Score indicates the setup is balanced, return it for rendering to the screen.
- Otherwise, generate another random setup and check its Balance Score.
- If, after generating a number of unbalanced setups, return the one with the best Balance Score and call it a day.
Argent: The Consortium is one of my top 10 games and I had a lot of fun building the Balancer for it. For me it's a great mental challenge to create one of these balancers. Each game offers different mechanics and different methods for doing the analysis.
I hope you found this interesting and it gives you new insight into Argent's mechanics.
If you're looking to buy Argent, please support Board Game Helpers by using one of the affiliate links below. Thank you!
- Buy Argent: The ConsortiumBuy @ Amazon
- Argent: Mancers of the University Expansion