
This article is about the Food Chain Magnate Map Generator's balanced map feature.
To create a "balanced" layout, I generated over 8,000 random maps and looked at
various map characteristics (number of houses, size of neighborhood, etc...) to see where the average of their values lay.
To do this, I took all of the values generated and determined the full range of each. Then I used stastical quartiles to ascertain the middle 50% of the values.
This subset (the 2nd and 3rd quartiles) is the basis for defining and Ideal Range for each characteristic.
I created ranges for each player number due to the map size differences.
I have defined a "balanced map" as one where all of its characteristics fall within the specified range.
Below I have outlined each map characteristic I used and determined an Ideal Range.
- The characteristic name and description. Some characteristics are for the entire map, some characteristics are for an individual road system or neighborhood
- A graph of the values randomly generated (by player count)
- The range in which 50% or more of the values fall
- Map - This is the randomly chosen set of tiles (including random rotations) that contain the houses, roads, drinks, neighborhoods, and spaces.
- Map Space - Each map tile is broken down into 25 map spaces which could be a road, a house (a house contains 4 map spaces), a single drink location, or simply an empty white space.
- Starting House - A Starting House is one of the printed houses on a map tile. Each one has a number assigned to it which can be used to uniquely identify it.
- Drink Location - A Drink Location (or Drink Spot) is one of the printed drink icons on a map tile. It could be Lemonade, Beer, or Soda. Each one can be uniquely identifed by its drink type and the Tile Id.
- Road System - A Road System (or Path System) is an independent set of road segments that connect across tiles that can be traveled along when delivering food or collecting drinks. A Map will usually contain multiple independent road systems that cannot be traveled between because they do not connect in any way.
- Neighborhood - A Neighborhood is an independent set of Starting Houses, drinks spots, and white spaces that is completely enclosed by one or more
Road Systems and/or the edge of the map. Think of it as the area that would be affected by single Mail Marking Campaign.
Below is the list of characteristics that have had statistical analysis done to determine their ideal ranges for each number of players (2, 3, 4, or 5).
- Total Starting Houses on the Map - This is the number of total starting houses on the map. There are 11 starting houses printed on the 20 map tiles.
- Starting Houses in a Single Neighborhood - A neighborhood starts with certian number of houses. This is the number of total starting houses within a neighborhood. These houses would be affected by single Mail Marking Campaign in that neighborhood.
- Starting Houses on a Single Road System - This is the number of total starting houses that can be delivered to on a given road system. These houses could be along the road system or at the end of a dead end. Note that starting houses can be along multiple road systems if they touch different ones.
- Total Drink Locations on the Map - This is the number of total drink locations (soda, beer, and lemonade) on the map. There are 13 drink locations printed on the 20 map tiles.
- Drink Locations on a Single Road System - This is the number of total drink locations (beer, soda, and lemonade) on a given road system. This means a restaurant location on that road system has access to them (pick up drinks) using the Cart Operator or Truck Driver.
- Number of Independent Neighborhoods on the Map - This is the total number of independent neighborhoods on the generated map. Some can be very small (4 white map spaces) while some can be very large (dozens of map spaces).
- Number of Total Spaces in a Single Neighborhood - This is the number of map spaces that are included in a given neighborhood. These map spaces could be a drink location, part of a house, or simply an empty white space. Larger neighborhoods are comprised of more map spaces.
- Average Size of a Single Neighborhood - Given the ranges defined above, a random neighborhood is assigned a size based on its total number of map spaces within it (including houses, drink locations, and empty spaces): Tiny, Small, Medium, Large, and Huge. The intent is to define a normalized distribution (aka a bell curve) for neighborhood sizes to be able to weed out the statistical outliers.
- Number of Empty Spaces in a Single Neighborhood - This is the number of empty map spaces that are included in a given neighborhood. These are the spaces that are available for houses, gardens, and restaurants. Larger neighborhoods are comprised of more empty map spaces.
- Average Size of a Single Neighborhood's Empty Spaces - Given the ranges defined above, a neighborhood is assigned a size based on its total number of empty map spaces (available for houses, gardens, and restaurants) within it: Tiny, Small, Medium, Large, and Huge. The intent is to define a normalized distribution (aka a bell curve) of the size of the build-able real estate of random neighborhoods.
- Number of Independent Road Systems on the Map - This is the total number of independent road systems on the map. Some can be very small (spanning only the corner of the map) while some can be very large (spanning the entire map).
- Number of Routes in a Single Road System - This is the number of routes one could take when traveling along on a given road system. Note: it does not include all permutations of routes if there are looped routes within the road system. Larger road systems are comprised of more possible routes.
- Average Size of a Road System - Given the ranges defined above, a random road system is assigned a size based on its total number of possible routes within it: Tiny, Small, Medium, Large, and Huge. The intent is to define a normalized distribution (aka a bell curve) of the size of random road systems.
If you'd like to read the details about the calculations for any or all of those characteristics, below are the details and graphs.
This is the number of total starting houses on the map.
There are 11 starting houses printed on the 20 map tiles.
Understanding the Graphs
X Axis: The number of Starting Houses on a single map
Y Axis: The number of maps generated with that number of Starting Houses
For example, the 2 Player graph shows that there were anywhere between 2 and 8 houses per map and there were a little over 700 maps that had 5 houses on them.
The graphs show that the house count distribution follows a bell curve making it easy to determine where the sweet spots are.
The Balancer's Ideal Range
The idea is there shouldn't be too few or too many starting houses on map.
The Ideal Range is where a map's starting house count falls within the 2nd and 3rd quartiles of the data set (i.e. middle 50% of the normal distribution).
Note: The 5 Player map contains all 20 tiles and thus will always contain 11 houses.
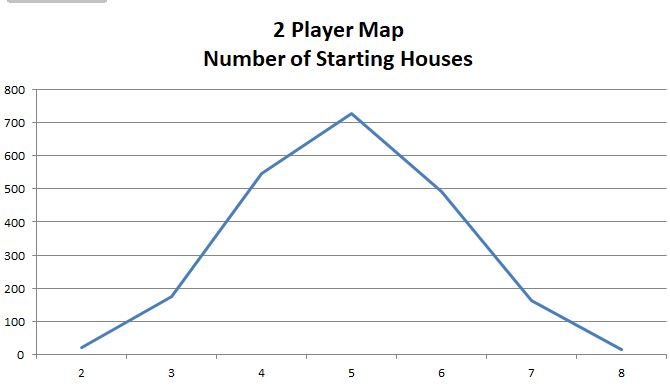
Ideal Range for 2 Player Maps: 4 - 6 starting houses
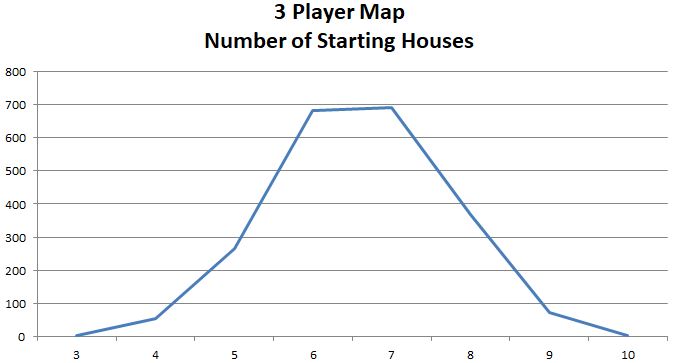
Ideal Range for 3 Player Maps: 6 - 7 starting houses
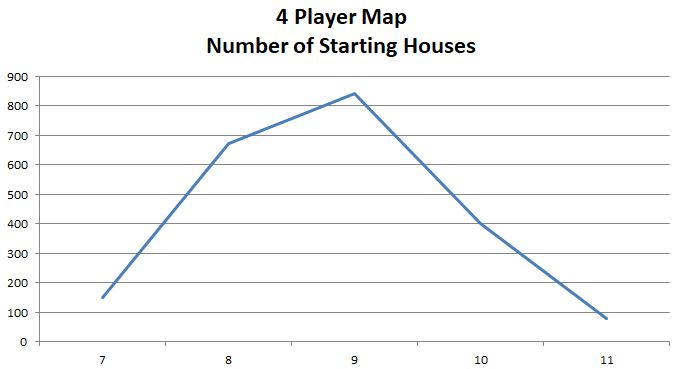
Ideal Range for 4 Player Maps: 8 - 9 starting houses
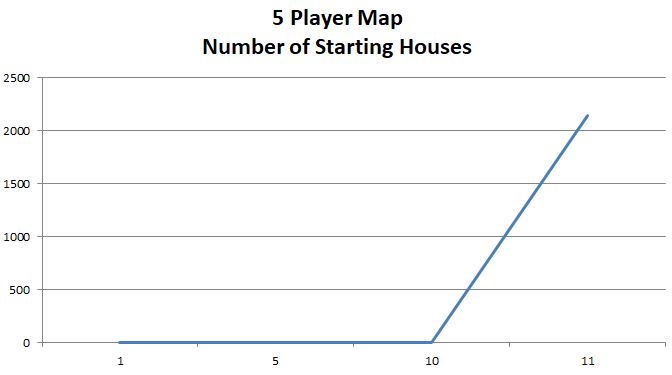
5 Player Maps will always be exactly 11 starting houses
|
A neighborhood starts with certain number of houses.
This is the number of total starting houses within a neighborhood.
These houses would be affected by single Mail Marking Campaign in that neighborhood.
Understanding the Graphs
X Axis: The number of Starting Houses in a single neighborhood
Y Axis: The number of neighborhoods generated with that number of Starting Houses
For example, the 2 Player graph shows that neighborhoods contained between 1 and 7 houses in them and there were a little over 5,000 occurrences of neighborhoods that had only 1 house in them.
The graphs show that there is a strong tendency for neighborhoods to have very few houses in them, which is understandable
because it is expected that most neighborhoods are small and have no houses in them.
The Balancer's Ideal Range
The idea is there shouldn't be too many starting houses in any given neighborhood.
The Ideal Range is where a neighborhood's number of starting houses is within the 1st, 2nd or 3rd quartiles of the data set (i.e. exclude the upper 25% of occurrences).
Also, a neighborhood shouldn't have too high of a percentage of the total starting houses on the map.
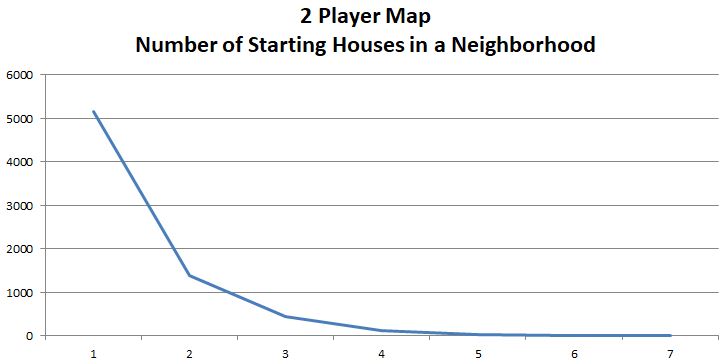
Ideal Range for 2 Player Maps: 2 starting houses or less and
no more than 28% of the starting houses on map

Ideal Range for 3 Player Maps: 2 starting houses or less and
no more than 21% of the starting houses on map
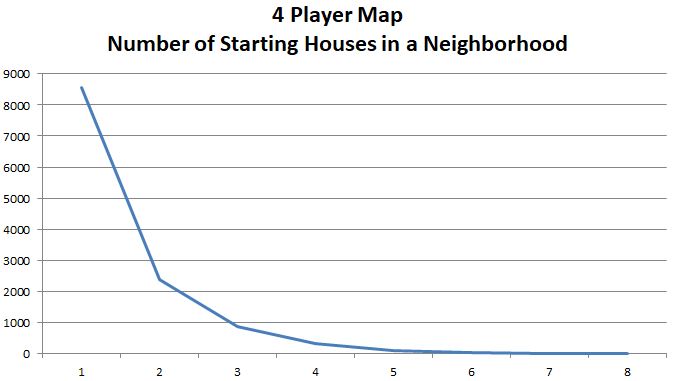
Ideal Range for 4 Player Maps: 2 starting houses or less and
no more than 16% of the starting houses on map
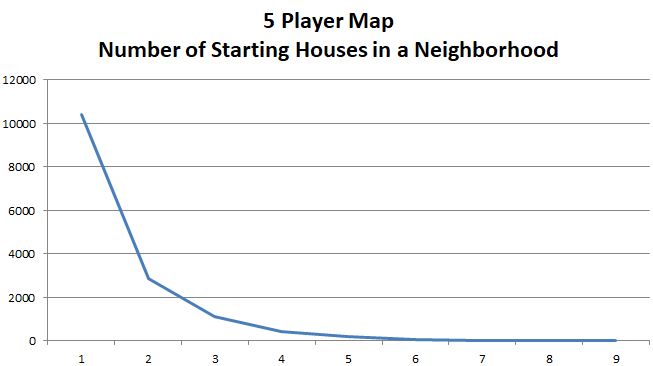
Ideal Range for 5 Player Maps: 3 starting houses or less and
no more than 20% of the starting houses on map
|
This is the number of total starting houses that can be delivered to on a given road system.
These houses could be along the road system or at the end of a dead end.
Note that starting houses can be along multiple road systems if they touch different ones.
Understanding the Graphs
X Axis: The number of Starting Houses on a single road system
Y Axis: The number of road systems generated with that number of Starting Houses
For example, the 2 Player graph shows that road systems contained between 0 and 8 houses on them and there were a little over 600 occurrences of road systems that had 4 houses in them.
The graphs show that there is a slight tendency towards to having numerous houses per road system, especially on the larger maps.
In fact, on a 5 Player map, you can see that it's highly probable to have all of the houses on a single road system.
The Balancer's Ideal Range
The idea is there shouldn't be too many starting houses in any given road system because if a restaurant controls a single road system has access to most of the map's houses.
The Ideal Range is where a road system's number of starting houses is within the 1st, 2nd or 3rd quartiles of the data set (i.e. exclude the upper 25% of occurrences).
Also, a road system shouldn't have too high of a percentage of the total starting houses on the map.
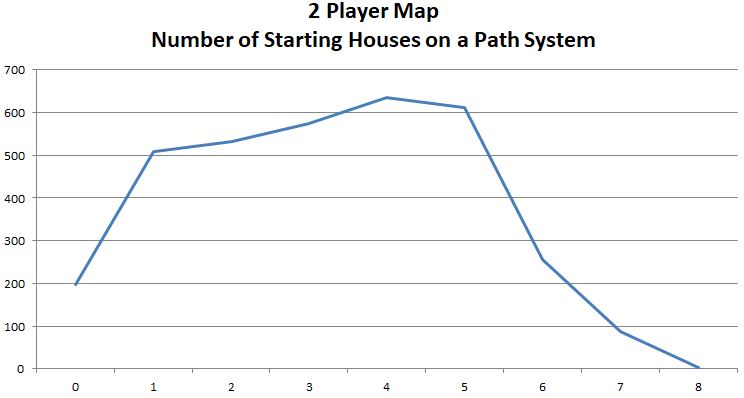
Ideal Range for 2 Player Maps: 3 starting houses or less and
no more than 65% of the starting houses on map
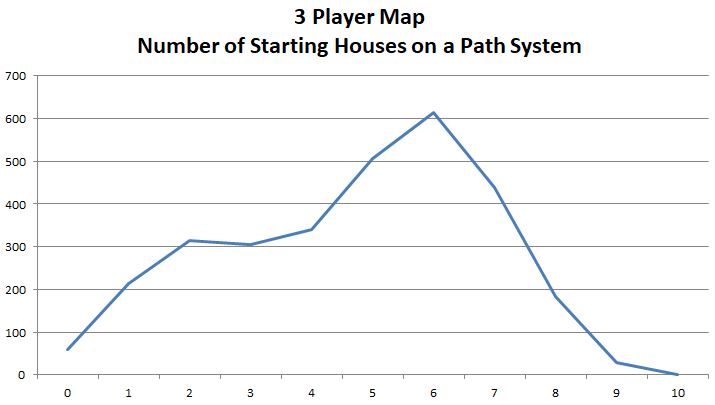
Ideal Range for 3 Player Maps: 4 starting houses or less and
no more than 71% of the starting houses on map
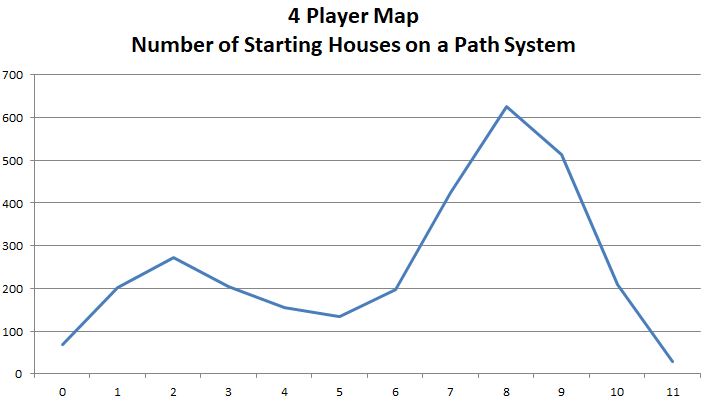
Ideal Range for 4 Player Maps: 6 starting houses or less and
no more than 70% of the starting houses on map

Ideal Range for 5 Player Maps: 7 starting houses or less and
no more than 70% of the starting houses on map
|
This is the number of total drink locations (soda, beer, and lemonade) on the map.
There are 13 drink locations printed on the 20 map tiles.
Understanding the Graphs
X Axis: The number of Drink Locations on a single map
Y Axis: The number of maps generated with that number of Drink Locations
For example, the 2 Player graph shows that there were anywhere between 1 and 11 drink locations per map and there were a almost 500 maps that had 6 total drink locations on them.
Like the starting houses, the graphs show that the drink location distribution follow a bell curve making it easy to determine where the sweet spots are.
The Balancer's Ideal Range
The idea is there shouldn't be too few or too many drink locations on map.
Also, there should be a fairly even distribution of drink types (soda, beer, lemonade) so there an equal opportunity of obtaining drinks.
The Ideal Range is where a map's drink Location count to falls within the 2nd and 3rd quartiles of the data set (i.e. middle 50% of the normal distribution).
Note: The 5 Player map contains all 20 tiles and thus will always contain 13 drink locations.
Ideal Range for 2 Player Maps: 5 - 7 drink locations with at least 1 of each type
Ideal Range for 3 Player Maps: 7 - 9 drink locations with at least 2 of each type
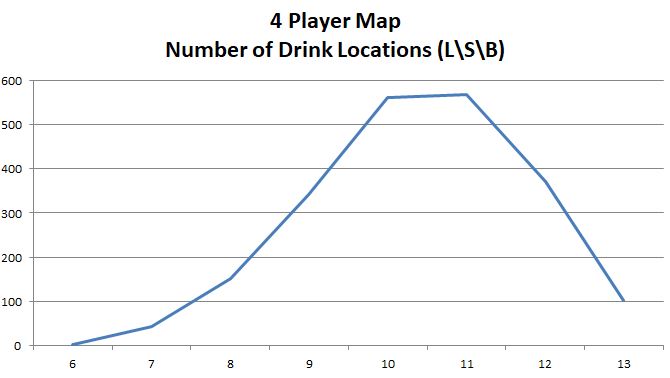
Ideal Range for 4 Player Maps: 9 - 11 drink locations with at least 3 of each type
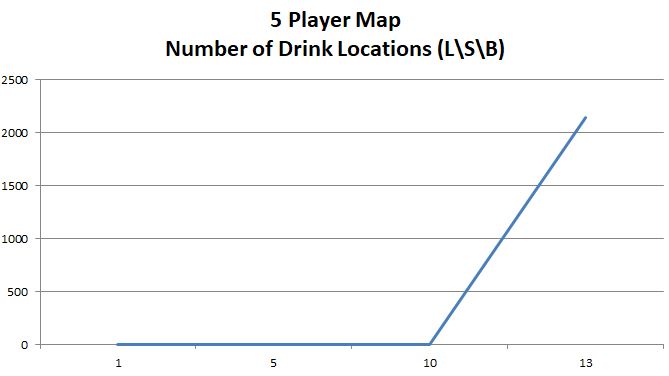
5 Player Maps will always be exactly 13 drink locations with at least 4 of each type
|
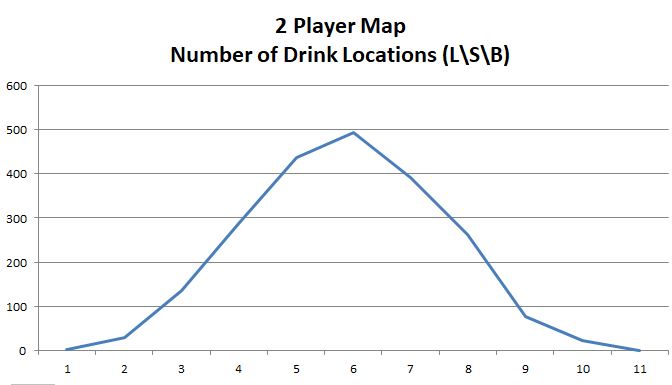
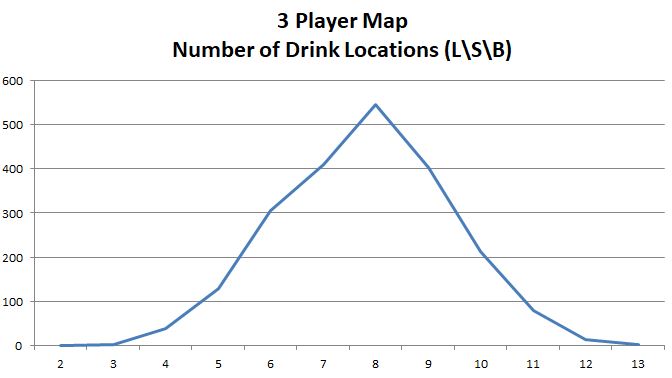
This is the number of total drink locations (beer, soda, and lemonade) on a given road system.
This means a restaurant location on that road system has access to them (pick up drinks) using the Cart Operator or Truck Driver.
Understanding the Graphs
X Axis: The number of Drink Locations on a single road system
Y Axis: The number of road systems generated with that number of Drink Locations
For example, the 2 Player graph shows that road systems contained between 0 and 10 drink locations on them and there were over 500 occurrences of road systems that had only 1 drink location on them.
The graphs show that it more likely to very few drink locations on a road system or almost all of the drink locations on a road system, especially on the larger maps.
In fact, on a 5 Player map, it's highly probable to have nearly all of the drink locations on a single road system.
The Balancer's Ideal Range
The idea is there shouldn't be too many drink locations in any given road system because if a restaurant controls a single road system has access to most of the map's drink locations.
The Ideal Range is where a road system's number of drink locations is within the 1st, 2nd or 3rd quartiles of the data set (i.e. exclude the upper 25% of occurrences).
Also, a road system shouldn't have too high of a percentage of the total drink locations on the map.
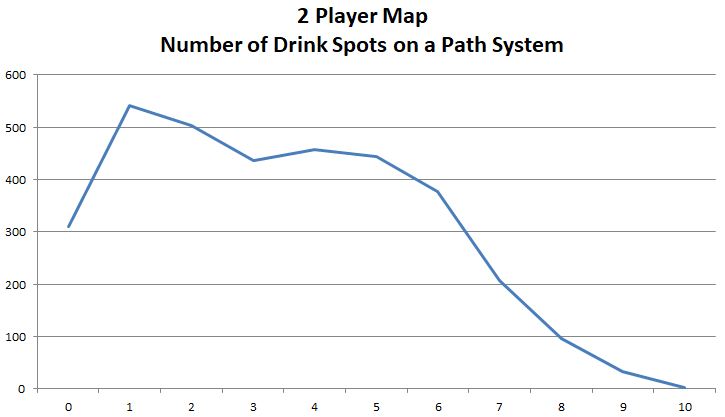
Ideal Range for 2 Player Maps: 3 drink locations or less
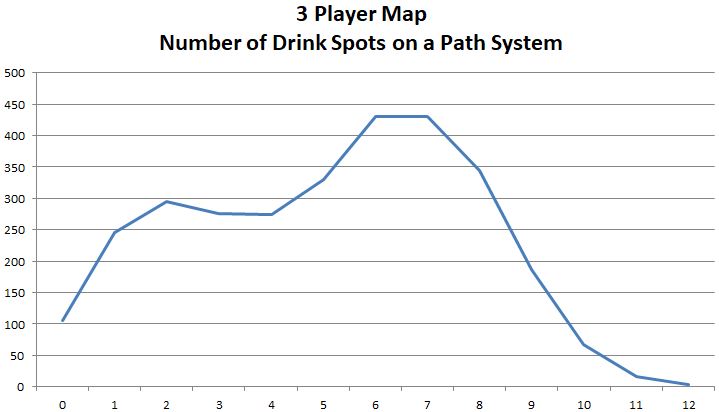
Ideal Range for 3 Player Maps: 5 drink locations or less
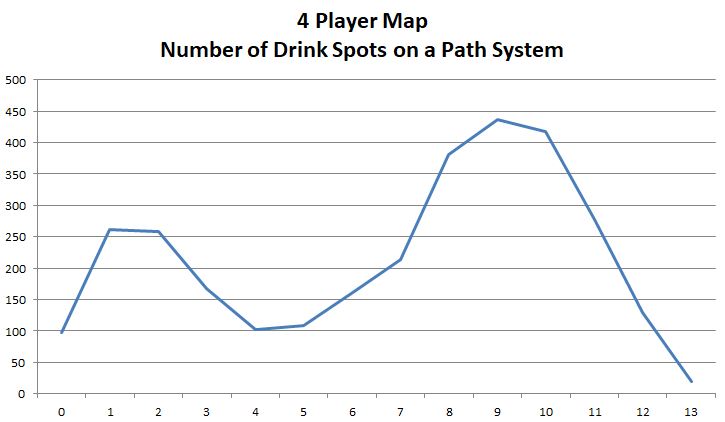
Ideal Range for 4 Player Maps: 7 drink locations or less
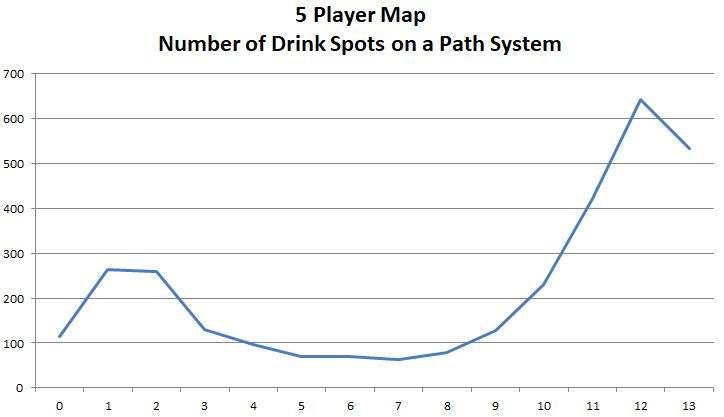
Ideal Range for 5 Player Maps: 8 drink locations or less
|
This is the total number of independent neighborhoods on the generated map.
Some can be very small (4 white map spaces) while some can be very large (dozens of map spaces).
Understanding the Graphs
X Axis: The number of Independent Neighborhoods on a single map
Y Axis: The number of maps generated with that number of Independent Neighborhoods
For example, the 2 Player graph shows that there were anywhere between 6 and 16 independent neighborhoods per map and there were just over 500 maps that had 11 independent neighborhoods on them.
The graphs show that the neighborhood size distribution follows a bell curve making it easy to determine where the sweet spots are.
The Balancer's Ideal Range
The idea is there shouldn't be one huge neighborhood containing all of the starting houses because the mail campaigns become king maker plays.
Also, too many tiny neighborhoods make it difficult to build new houses with gardens.
The Ideal Range is where a map's number of neighborhood systems falls within the 2nd and 3rd quartiles of the data set (i.e. middle 50% of the normal distribution).
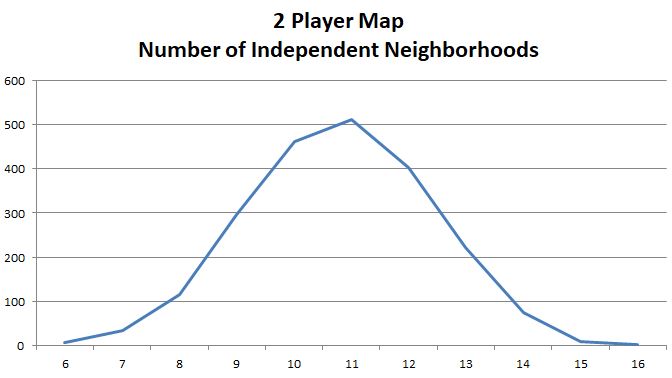
Ideal Range for 2 Player Maps: 10 - 12 neighborhoods
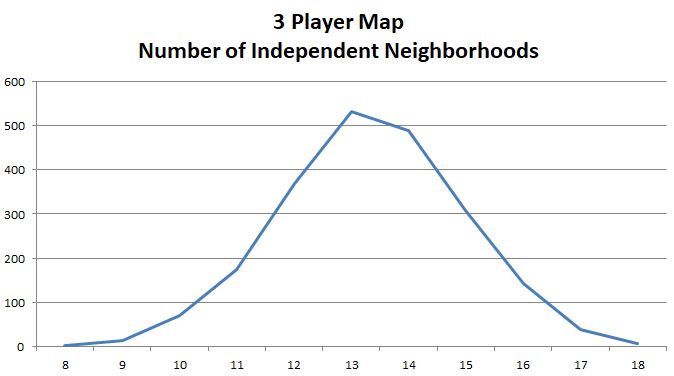
Ideal Range for 3 Player Maps: 12 - 14 neighborhoods
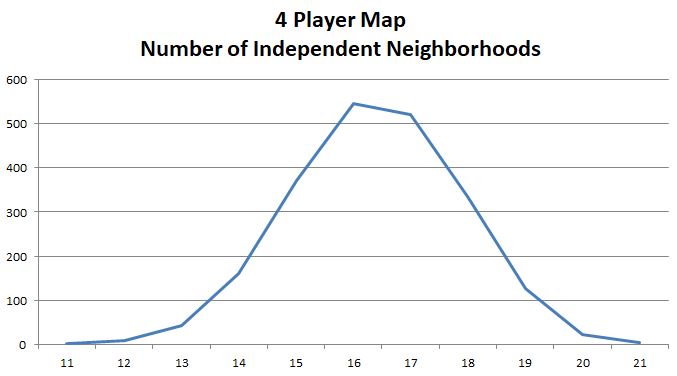
Ideal Range for 4 Player Maps: 15 - 17 neighborhoods
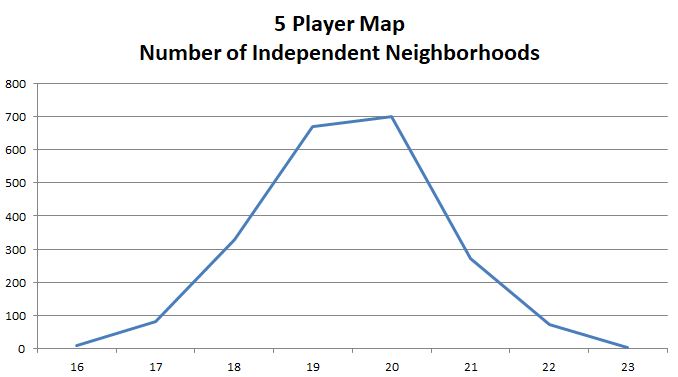
Ideal Range for 5 Player Maps: 19 - 20 neighborhoods
|
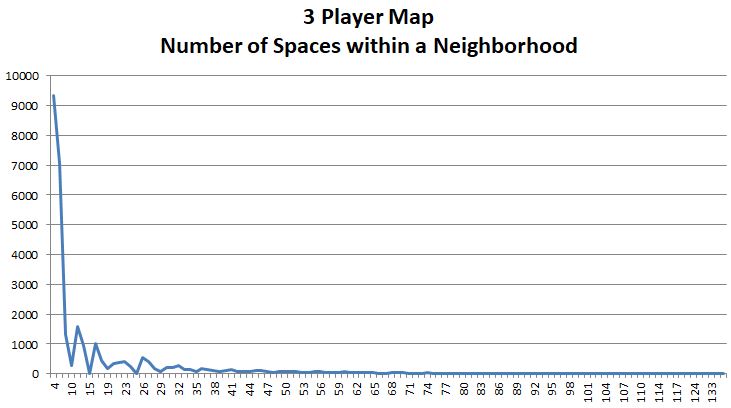
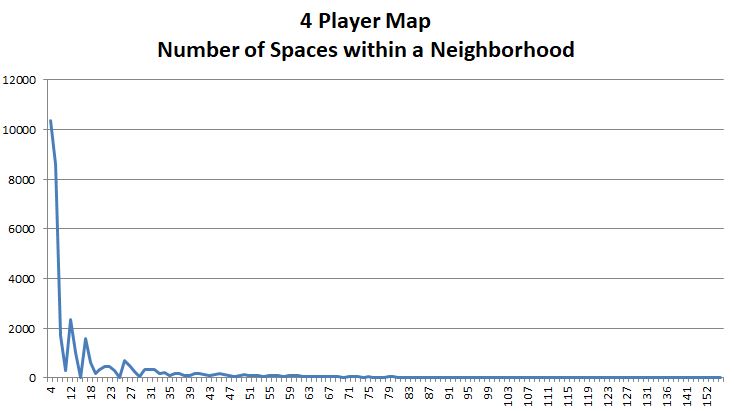
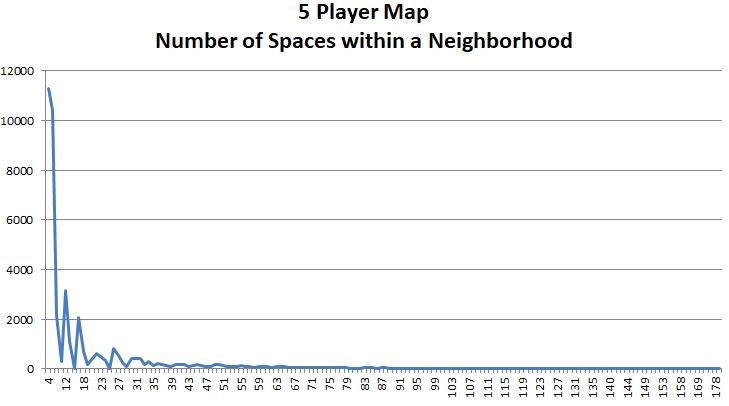
This is the number of map spaces that are included in a given neighborhood.
These map spaces could be a drink location, part of a house, or simply an empty white space.
Larger neighborhoods are comprised of more map spaces.
Understanding the Graphs
X Axis: The number of Total Spaces in a single neighborhood
Y Axis: The number of neighborhoods generated with that number of Total Spaces
For example, the 2 Player graph shows that neighborhoods contained anywhere between 4 and 116 total spaces and there were over 8,000 occurrences of neighborhoods that contained exactly 4 map spaces.
Many of the neighborhoods generated are comprised of only 4 map spaces in size in a 2x2 grid, just big enough for a single house without a garden or a restaurant.
The Balancer's Ideal Range
The Balancer doesn't reference a neighborhood's total map space count directly.
Instead, it has bucketed the values into 5 size ranges: Tiny, Small, Medium, Large, and Huge.
See graphs to the right for range definitions.
See below how they are used.
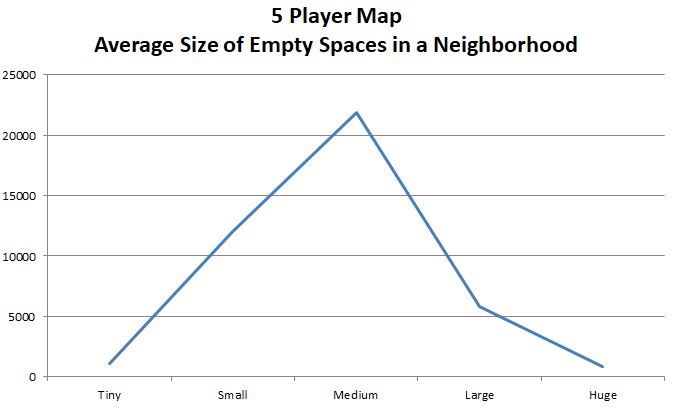
Tiny=[1]; Small=[2-4]; Medium=[5-23]; Large=[24-87]; Huge=[88+];
Tiny=[4 & less]; Small=[5-8]; Medium=[9-35]; Large=[36-91]; Huge=[92+];
Tiny=[1]; Small=[2-4]; Medium=[5-26]; Large=[27-102]; Huge=[103+];
Tiny=[1]; Small=[2-4]; Medium=[5-24]; Large=[25-65]; Huge=[66+];
|
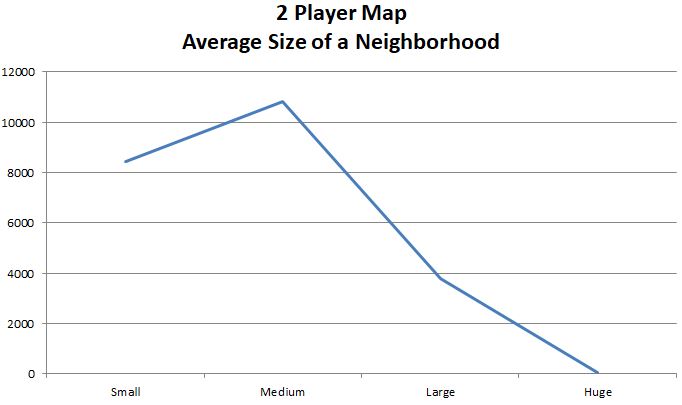
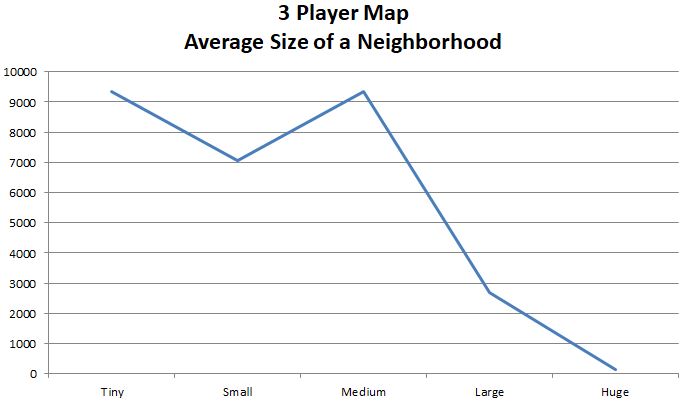
Given the ranges defined above, a random neighborhood is assigned a size based on its total number of map spaces within it (including houses, drink locations, and empty spaces): Tiny, Small, Medium, Large, and Huge.
The intent is to define a normalized distribution (aka a bell curve) for neighborhood sizes to be able to weed out the statistical outliers.
Understanding the Graphs
X Axis: The number of Tiny / Small / Medium / Large / Huge Neighborhoods based on Total Spaces on a single map
Y Axis: The number of maps generated with that number of Neighborhood Sizes
For example, the 2 Player graph shows there were over 10,000 occurrences of Medium sized neighborhoods based on total map spaces.
On 3 Player maps, there is very high tendency for neighborhoods to be exactly 4 map spaces (2x2 square), thus skewing the Tiny category.
The Balancer's Ideal Range
The idea is to have a minimum number of good sized neighborhoods so houses with gardens and restaurants can be built in them.
The Ideal Range is to have meet or exceed a threshold number of "larger-sized" neighborhoods.
Ideal Range for 2 Player Maps: at least 1 neighborhood sized Medium or larger
Ideal Range for 3 Player Maps: at least 1 neighborhood sized Medium or larger
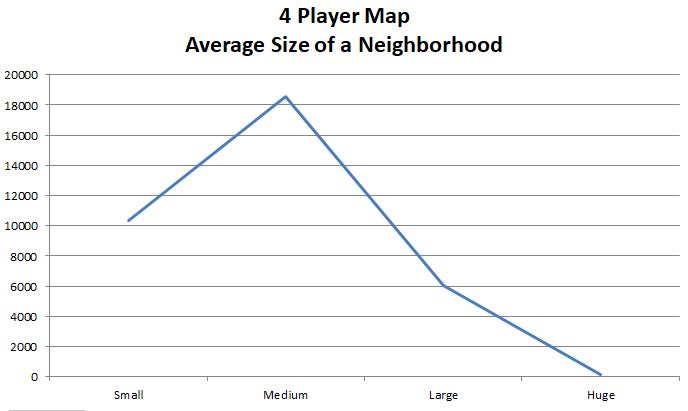
Ideal Range for 4 Player Maps: at least 1 neighborhood sized Medium or larger
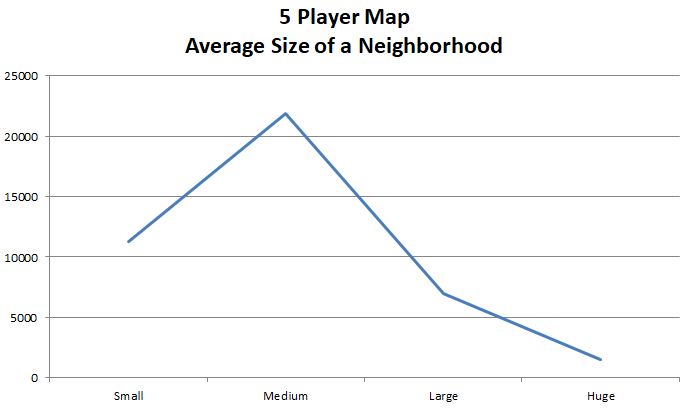
Ideal Range for 5 Player Maps: at least 1 neighborhood sized Medium or larger
|
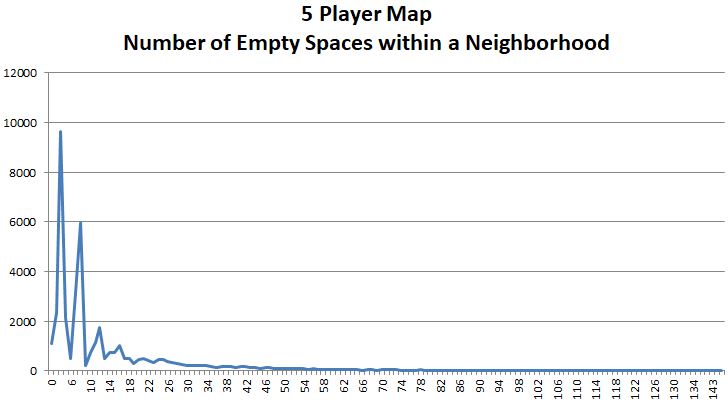
This is the number of empty map spaces that are included in a given neighborhood.
These are the spaces that are available for houses, gardens, and restaurants.
Larger neighborhoods are comprised of more empty map spaces.
Understanding the Graphs
X Axis: The number of Empty Spaces in a single neighborhood
Y Axis: The number of neighborhoods generated with that number of Empty Spaces
For example, the 2 Player graph shows that neighborhoods contained anywhere between 0 and 94 empty spaces and there were almost 7,000 occurrences of neighborhoods that contained exactly 4 map spaces.
Many of the neighborhoods generated are comprised of only 4 empty map spaces in size in a 2x2 grid, which is just big enough for a single house without a garden or a restaurant.
There are also a number of neighborhoods generated with 0 empty map spaces meaning the 2x2 grid is completely filled with a starting house.
The Balancer's Ideal Range
The Balancer doesn't reference a neighborhood's empty map space count directly.
Instead, it has bucketed the values into 5 size ranges: Tiny, Small, Medium, Large, and Huge.
See graphs to the right for range definitions.
See below how they are used.

Tiny=[3 & less]; Small=[4]; Medium=[5-14]; Large=[15-72]; Huge=[73+];
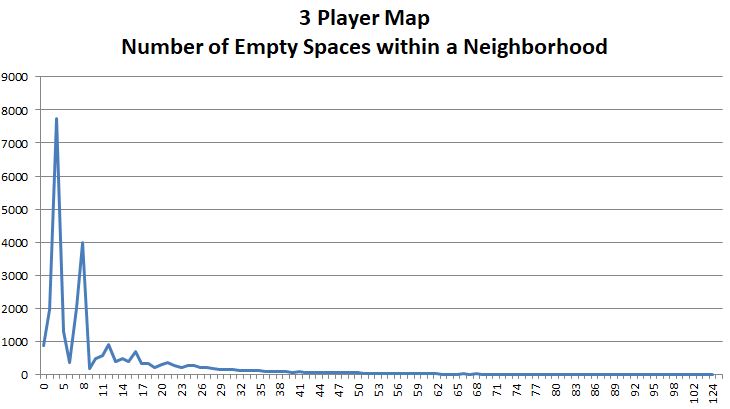
Tiny=[0]; Small=[1-4]; Medium=[5-30]; Large=[31-89]; Huge=[90+];
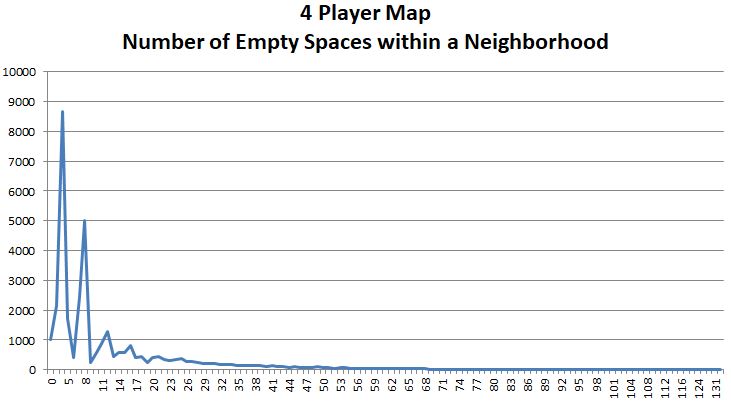
Tiny=[0]; Small=[1-4]; Medium=[5-24]; Large=[25-88]; Huge=[89+];
Tiny=[0]; Small=[1-4]; Medium=[5-16]; Large=[17-51]; Huge=[52+];
|
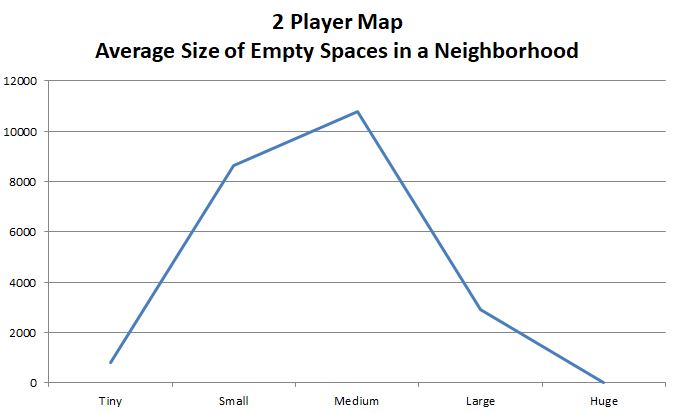
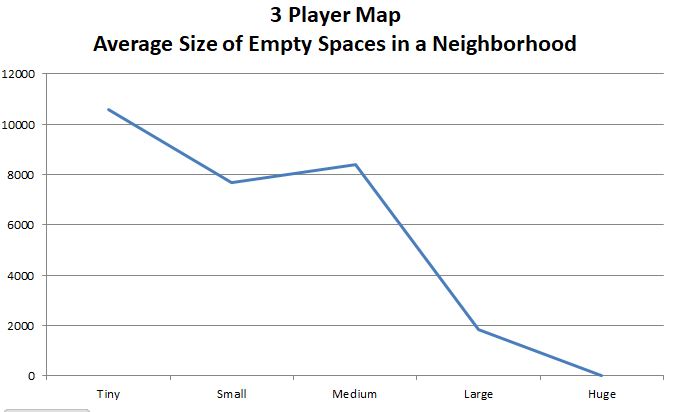
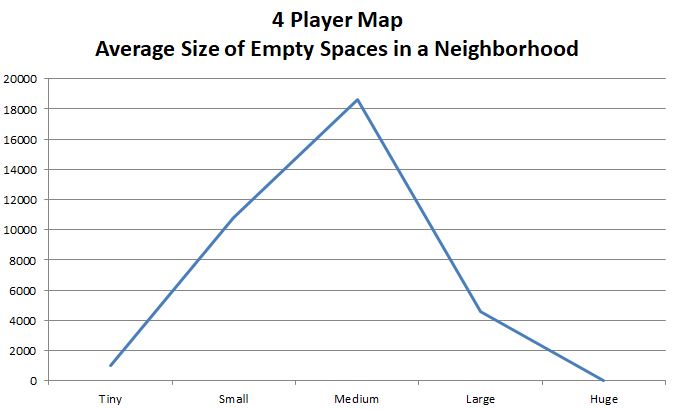
Given the ranges defined above, a neighborhood is assigned a size based on its total number of empty map spaces (available for houses, gardens, and restaurants) within it:
Tiny, Small, Medium, Large, and Huge.
The intent is to define a normalized distribution (aka a bell curve) of the size of the build-able real estate of random neighborhoods.
Understanding the Graphs
X Axis: The number of Tiny / Small / Medium / Large / Huge Neighborhoods based on Empty Spaces on a single map
Y Axis: The number of maps generated with that number of Neighborhood Sizes
For example, the 2 Player graph shows there were over 10,000 occurrences of Medium sized neighborhoods based on empty map spaces.
On 3 Player maps, there is very high tendency for neighborhoods to be exactly 4 map spaces (2x2 square), thus skewing the Tiny category.
The Balancer's Ideal Range
The idea is to have a minimum number of good sized neighborhoods so houses with gardens and restaurants can be built in them.
The Ideal Range is to have meet or exceed a threshold number of "larger-sized" neighborhoods by their empty space.
Ideal Range for 2 Player Maps: at least 1 neighborhood with empty spaces sized Medium or larger
Ideal Range for 3 Player Maps: at least 1 neighborhood with empty spaces sized Medium or larger
Ideal Range for 4 Player Maps: at least 1 neighborhood with empty spaces sized Medium or larger
Ideal Range for 5 Player Maps: at least 1 neighborhood with empty spaces sized Medium or larger
|
This is the total number of independent road systems on the map.
Some can be very small (spanning only the corner of the map) while some can be very large (spanning the entire map).
Understanding the Graphs
X Axis: The number of Independent Road Systems on a single map
Y Axis: The number of maps generated with that number of Independent Road Systems
For example, the 2 Player graph shows that there were anywhere between 1 and 5 independent road systems per map and there were just almost 900 maps that had only 2 independent road systems on them.
The distribution isn't quite a bell curve, but it's close.
The Balancer's Ideal Range
The idea is there shouldn't be too many small, independent road systems that make it inefficient to collect drinks or gain wide distribution of food.
Also, huge road systems that generally span the entire map should be avoided as statistical outliers.
The Ideal Range is where a map's number of independent road systems falls within the 2nd and 3rd quartiles of the data set (i.e. middle 50% of the normal distribution).
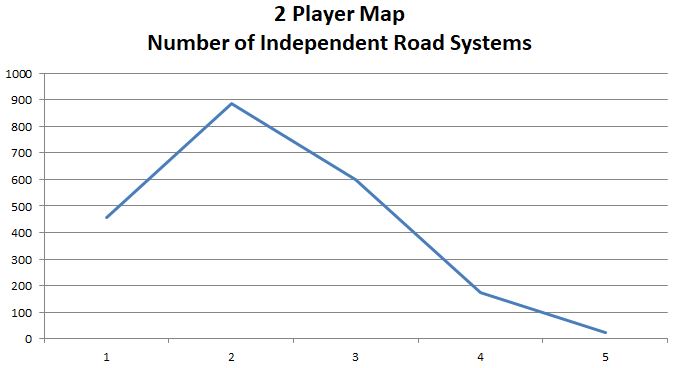
Ideal Range for 2 Player Maps: 2 - 99 road systems
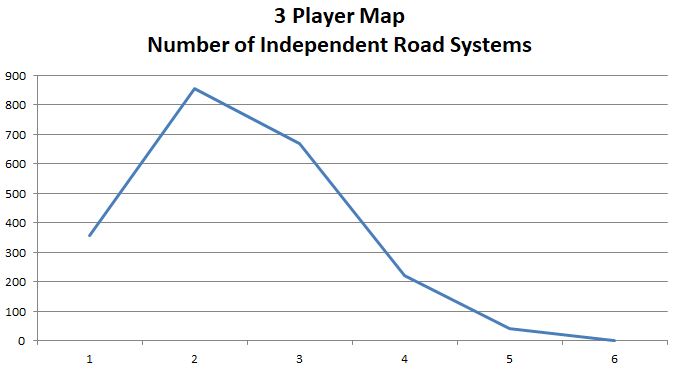
Ideal Range for 3 Player Maps: 2 - 3 road systems
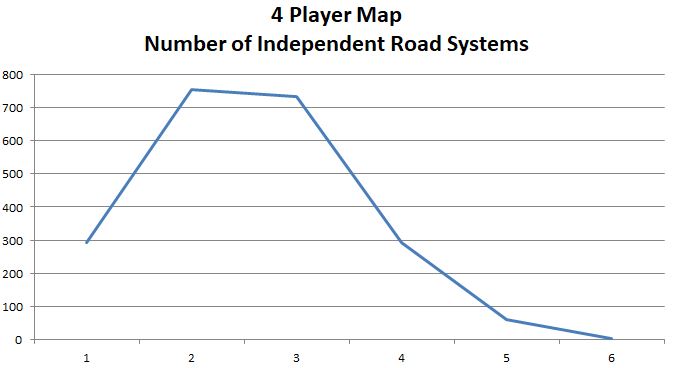
Ideal Range for 4 Player Maps: 2 - 3 road systems
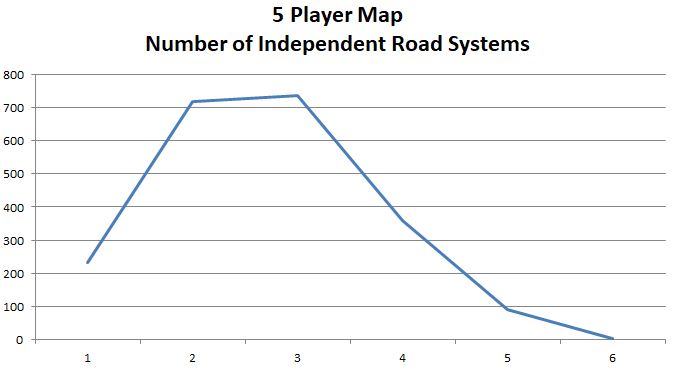
Ideal Range for 5 Player Maps: 2 - 3 road systems
|
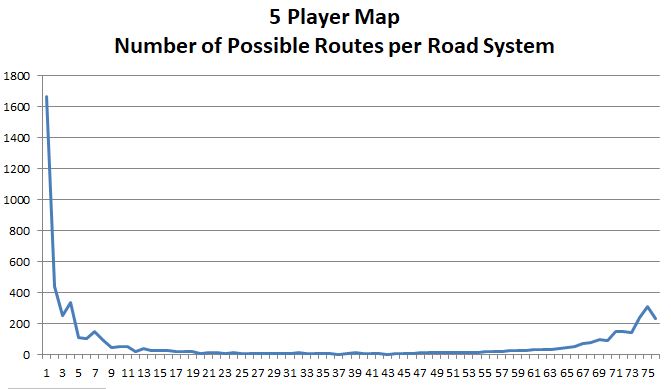
This is the number of routes one could take when traveling along on a given road system.
Note: it does not include all permutations of routes if there are looped routes within the road system.
Larger road systems are comprised of more possible routes.
Understanding the Graphs
X Axis: The number of Routes in a single road system
Y Axis: The number of road systems generated with that number of Routes
For example, the 2 Player graph shows that road systems contained anywhere between 1 and 47 routes and there were almost 1,200 occurrences of road systems that contained only 1 possible route.
Many of the road systems generated are only 1 route long where the road enters from a corner of the map and then immediately exits at the same corner.
The Balancer's Ideal Range
The Balancer doesn't reference a road system's number of possible routes directly.
Instead, it has bucketed the values into 5 size ranges: Tiny, Small, Medium, Large, and Huge.
See graphs to the right for range definitions.
See below how they are used.
Tiny=[1]; Small=[2]; Medium=[3-29]; Large=[30-39]; Huge=[40+];
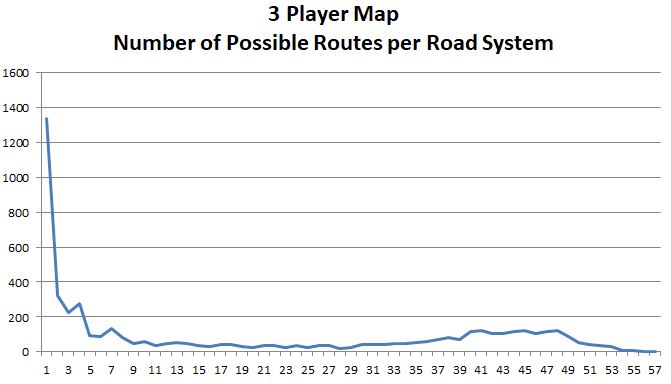
Tiny=[1]; Small=[2-4]; Medium=[5-40]; Large=[41-54]; Huge=[55+];
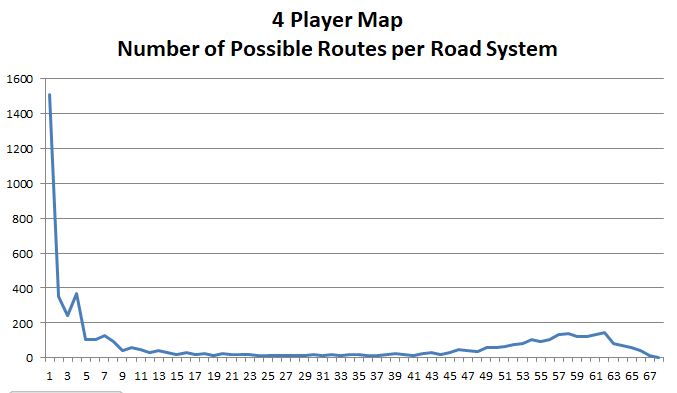
Tiny=[1]; Small=[2-4]; Medium=[5-54]; Large=[55-66]; Huge=[67+];
Tiny=[1]; Small=[2-4]; Medium=[5-69]; Large=[70-75]; Huge=[76+];
|
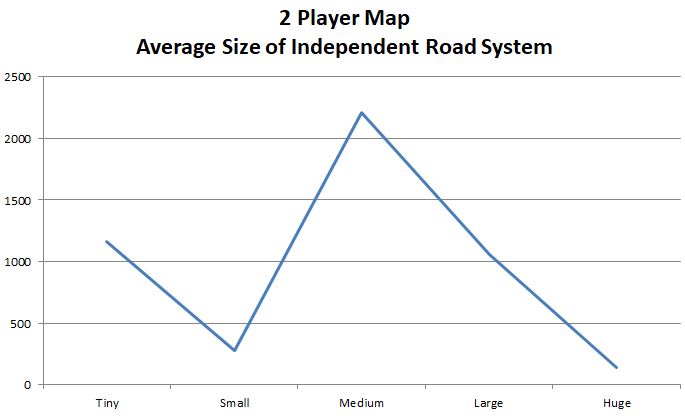
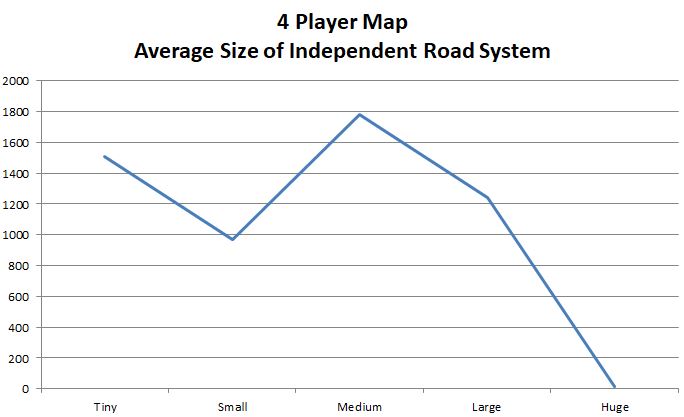
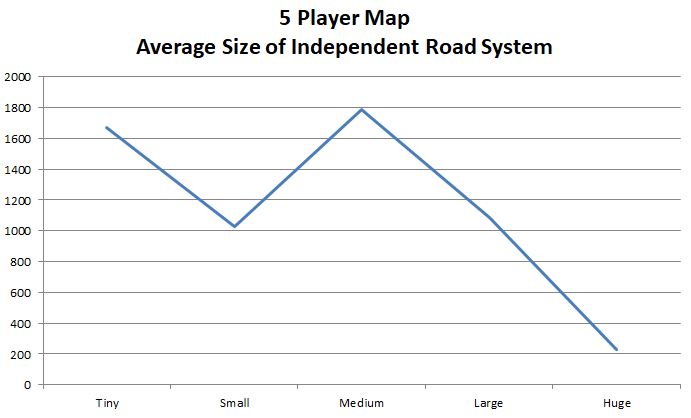
Given the ranges defined above, a random road system is assigned a size based on its total number of possible routes within it: Tiny, Small, Medium, Large, and Huge.
The intent is to define a normalized distribution (aka a bell curve) of the size of random road systems.
Understanding the Graphs
X Axis: The number of Tiny / Small / Medium / Large / Huge Road Systems on a single map
Y Axis: The number of maps generated with that number of Road System Sizes
For example, the 2 Player graph shows there were over 2,000 occurrences of Medium sized road systems based on number of routes.
There is very high tendency for road systems to be only 1 path long, thus skewing the Tiny category.
The Balancer's Ideal Range
The idea is to have a minimum number of good sized road systems so restaurant locations have good access to drinks and house locations.
The Ideal Range is to have meet or exceed a threshold number of "larger-sized" road systems.
Ideal Range for 2 Player Maps: at least 1 system sized Medium or larger

Ideal Range for 3 Player Maps: at least 1 system sized Medium or larger
Ideal Range for 4 Player Maps: at least 1 system sized Medium or larger
Ideal Range for 5 Player Maps: at least 1 system sized Medium or larger
|